.png?width=688&name=postprocess-metal-portrait-2%20Cropped%20(1).png)
The metal printed models can be treated the same way as the steel manufactured parts are treated in the traditional ways, creating a great number of possibilities to improve the finish of the piece.
In this article, we explain the different processes that you can realize on your pieces to improve the surface quality.
Content Guide
Joining and repairing the pieces by soldering.
Drilling, boring or threading holes
Remove supports by cut
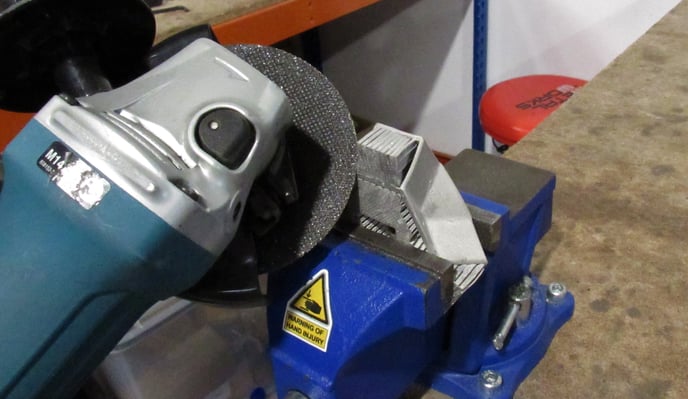
To remove the supports from your metal pieces you should cut them with electronic tools, for example, a radial saw. If the supports are thin enough, you can use metal cutting scissors.
Consider the next tips to do this process safely:
- Use adequate protection equipment: Cutting the metals with a redial raw can be quite dangerous because the metal parts can detach pieces can hit someone. Use glasses and protection gloves, remember to install the slicer protective shield.
- Hold the piece in a workbench: This is a safety measure to avoid that the piece detaching and improves the precision during the cutting process.
- Use the appropriate cutting discs: The 316L and the 17-4PH are stainless steel so it is necessary to use specific cutting discs for ensuring the durability of the disc and to avoid accidents. Most of the cutting discs are made of aluminum oxide.
- Divide the supports into sections: Before cutting the supports, it is recommended to divide the support structures into blocks to simplify the process.
After polishing the contact surface to improve the superficial quality of the area, as you can see in the next section.
Polish the model
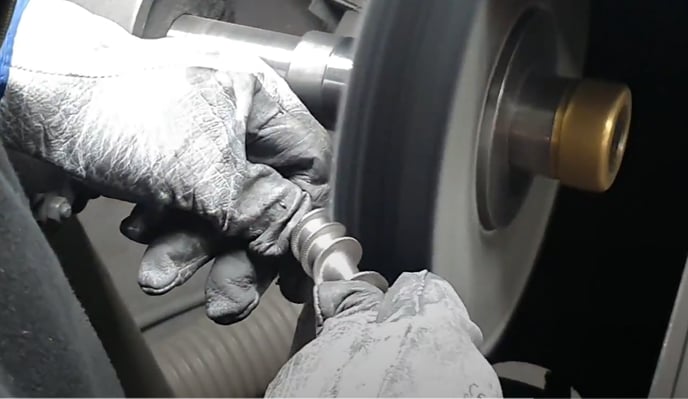
After the sintering process, the pieces can have an opaque finish and the printed layers can be visible. Polishing the piece is the ideal process to achieve a flat and bright surface.
There are different polishing processes according to the type of finish desired.
- Sandblasting: It consists in applying abrasive material to the piece to eliminate the rugosity and surface defects. This process allows having a flat piece without brightness.
- Polishing: It is the process that uses different tools to make the piece brighter, it may leave a mirror-type finish.
Note: Before sending the pieces to sintering you can slightly sand the piece, so this will make unnecessary the sandblasting process.
To realize a complete polish of the piece follows the next recommendations:
- Realize a sandblasting above the piece: Although it is not mandatory, this process saves a lot of time when polishing because it eliminates the piece's rugosity.
- Reduce the grit size of the polish tool progressively: Start with a polishing tape or highly abrasive sandpaper to equalize the superficial finish and progressively change the tapes with a thinner grit to obtain a mirror finish.
- Use a polish paste: This helps to lubricate the piece during the polishing process and for the piece to have a bright finish. The polish paste has different abrasive levels depending on the type of finish desired.
Joining and repairing the pieces by soldering.
.png?width=688&name=soldering-2%20Cropped%20(1).png)
One of the metal printing benefits is the ability to solder pieces, either for making a model assembly or for repairing a piece that has been damaged during the sintering process.
The stainless steels are compatible with the electric arc for soldering, TIG, and MIG/MAG, using the specific electrodes for the 316L or the 17-4PH.
To realize resistant welding follow the next recommendations:
- Use holding elements: Hold the pieces that you are going to weld with clamps that can be held to the workbench. This allows to realize the soldering process safely and with precision.
- Leave the necessary space between the models: Even though soldering is about joining pieces, is important to leave a small space between them, as large as the electrode diameter. This guarantees highly resistant soldering.
- Make soldering points: Start making soldering points between the pieces to create joining points that will help maintain the model position and to make precise soldering.
Consider the next safety tips when soldering your pieces:
- Clean the piece and tools: the dust, grease, and oxide can reduce the quality and the resistance of the soldering, so it is necessary to clean the surface piece and the electrodes.
- Use the safety equipment: The soldering process release a great amount of heat and energy so it is important the use protections like heating-resistant gloves and a solder mask.
- Check the ventilation in the workspace: during the soldering, some smoke that can be harmful is released, so it is important to ensure correct ventilation and control the quantity of smoke in the room.
Drilling, boring or threading holes
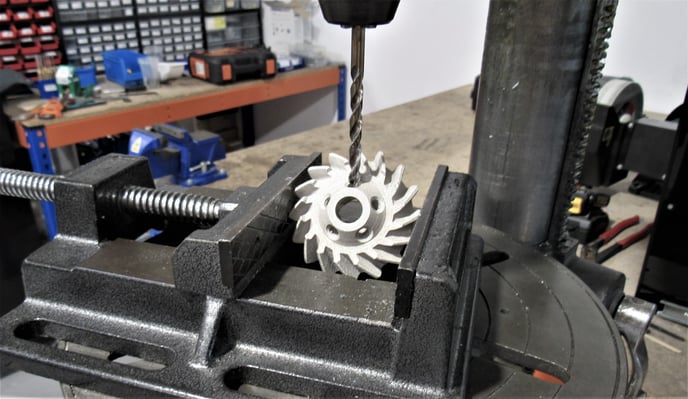
Another post-processing that can be performed is the drilling, boring, or threading holes. This makes the piece creations unnecessary, even though it is highly recommended to create the holes for the mechanization process.
- The drilling and boring holes can increase the hole diameter and improve its tolerance.
To realize this process you can use a drill with a bit for steel, and progressively change the bit for another that is larger until you get the desired size. - The threading has two main benefits, eliminating the need of designing the thread in the piece and obtaining the thread with the desired metric. This job can be done by using a tap for threading steel.
Suggestion: To simplify the mechanization process is recommended to use drills to avoid damaging the hole and improve the tool performance.
Forum community
Need more tips? Check out our forum community for more info.
It's important to keep your printer in good shape to make the most out of it. In this chart, you can find a list of the extruder maintenance procedures and how frequently these should be done. Maintenance Plan.
![]() Take your e-waste to a certified recycler. Check how we do it in BCN3D.
Take your e-waste to a certified recycler. Check how we do it in BCN3D.

|
You can help improve the BCN3D Knowledge Base. If you feel there are guides that we are missing or you found any error, please use this form to report it. Report form :) |