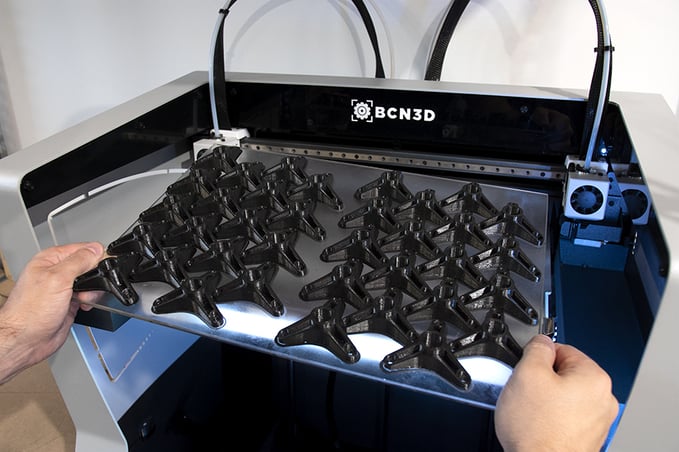
In this post, we explain our experts’ tricks to optimizing the printing surface to its maximum capabilities. In this case, when we talk about optimizing, we are referring to taking full advantage of the entire printing surface to hold the maximum amount of pieces, thus making the most of your BCN3D printer’s exceptional volumetric capacity.
This post focuses on the solution to diminished productivity with the use of the BCN3D Stratos software. To put it plainly, our Stratos software works by dividing the object into a stack of layers, known as slicing the object. This generates the G-code, containing all the information of the movements the extruder needs to make.
Since our explanation starts from the very beginning, we will first look at which parameters inhibit us from making full use of the printing surface, and then at what values and parameters we can modify to get the most out of our large printing surface.
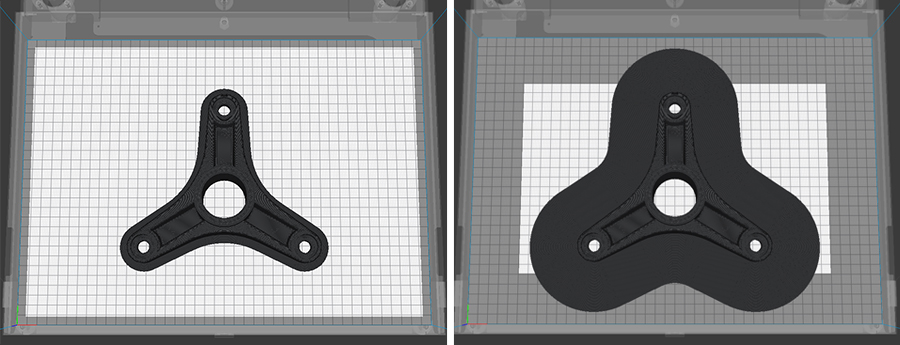
If you are an experienced 3D printer user, you will surely have come across a project or part that, although by its measures should theoretically fit on the platform, is not the right size for the printing surface. We will see that, in most cases, this is due to the shaded edge that appears on the perimeter of the platform in Stratos.

The total area of your printing surface is known as the usable area, the size of which is dependent on the model of your printer and dictated by the horizontal coordinates of the printing surface. In the case of the current BCN3D products as of 2021, this will be 420mm wide and 300mm long.
Due to the delimiting shadow in the exterior, an enclosed area is created inside the usable area. This area is known as the effective area, and is the area that really matters for us in the printing process.
The shadow mentioned above is caused by the adhesion build plates on the hotbed. These are different build plates to help improve both extrusion and adhesion to the printing plate, and are added automatically by the Stratos software. They vary depending on the requirements of the 3D model. Their use essentially depends on the material you are going to use. Among the build plates you can choose from are: skirt, brim, raft, and none.
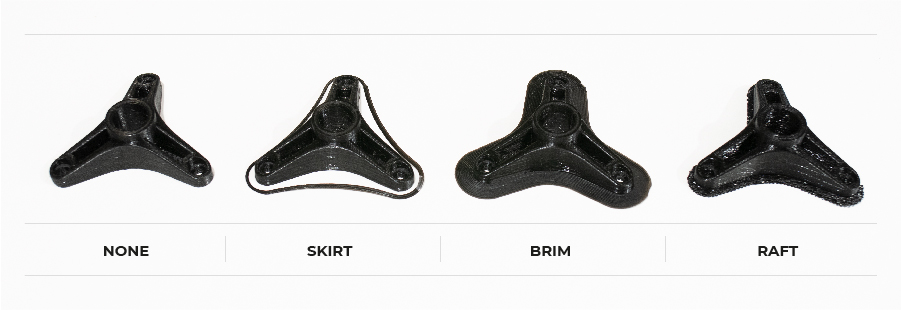
The skirt is the line printed around the model, but not connected to it. The separation of the model is determined by the skirt distance parameter, which is the horizontal distance between the skirt and the first layer of the print.
The border adds a single, flat layer area around the base of the model, to prevent it from deforming due to thermal shrinkage.
The wide border parameter establishes the distance from the model to the exterior border line. The large border improves the adhesion to the printing platform, but, in turn, reduces the effective printing area.
The raft adds a thick grid with a roof under the model. This results in a finish similar to that of the supports in the area of contact with the part. When the raft is active, its additional margin parameter determines the additional area of the raft around the model. Increasing this margin will create a stronger raft, but will use more material and reduce the effective area.
Note: To access these parameters and view them: preferences, adjustments, printing plate adhesion, etc.
If we decrease any of these three parameters we will be able to use more of the printing area. In the case of having a piece that requires the maximum possible area, you can choose the none option for the plate’s adhesion. In this mode, the 3D model will be printed directly. If you are using the none mode type of adhesion to the plate, we advise you to increase the start purge distance i.e. the filament purged before printing. This will ensure that the part extrudes correctly from the beginning.
In some cases, decreasing these distances is essential to adjust the effective area for the required measurements and orientation of the 3D model.

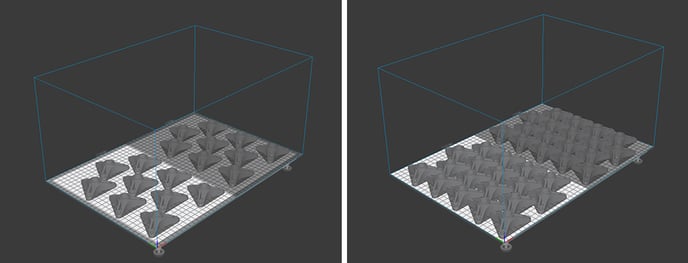
You may encounter another problem caused by the generated shadow of the model wasting part of the effective area. Many times, even visually, part of this shadow can be occupied by another object, but by default, it will not be used to print part of another printed piece.
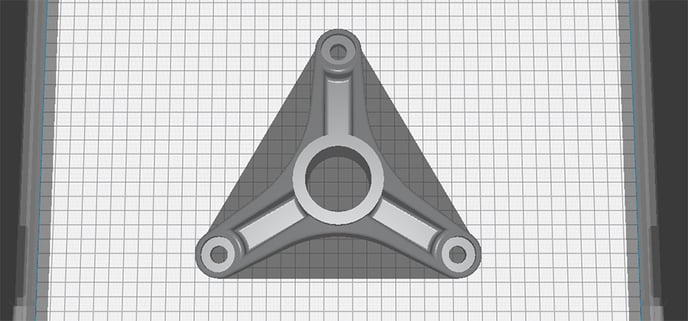
To be able to invade this space with another model, deactivate the option that reads ensure models are kept apart. Make sure that the models are separated by Preferences in the upper bar in the General section. Once deactivated, you will be able to take full advantage of the effective area, but you must be careful to leave enough separation between the models so that they do not intertwine and link physically to form a solid whole.
Using this option wisely is essential to maximizing the useful area of the printer, especially in printing platforms intended for the production of short or medium series of spare parts or end-use parts. It should be noted that, in combination with duplication mode, it is a very powerful tool to optimize our printing surfaces.
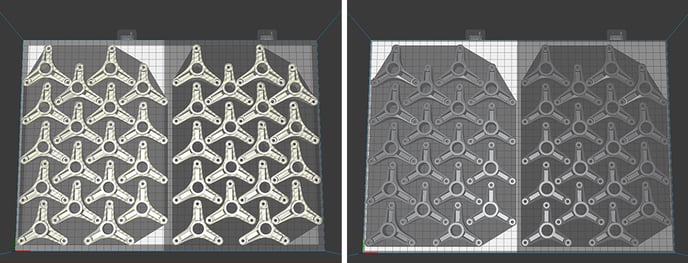
Generally, when you want to fill a platform with as many parts as possible, you usually load a model and multiply it directly from the Stratos software. To multiply, it is sufficient to select the piece with left click and ctrl+M, and choose how many equal pieces we want to add to the platform. However, this will make the software go slower and slower, due to the simple fact that it goes from reading only one file to an X amount of files more. Therefore, the more we want to add, the slower Stratos will become.
In order to solve this, we can generate the desired platform and save it as an STL directly from Stratos. This way, we will stop having numerous models, and, instead, have one that contains all the information of the X models. Also, if we delete all the models from the platform, the quick way to carry this out is to press ctrl+D, and add the new STL model that we have generated to the platform. All the pieces will appear on the platform in the position that you previously determined within the shared shadow. If it does not fit in the effective area, remember that you can decrease the width or the distance of the adhesion type to adjust the model to the bed.
In conclusion, maximizing your productivity is an essential aspect of any workflow. These tips and tricks are a sure-fire way to optimize the software, calibrate your 3D models correctly, and get the most out of every print job.
Community forum
Need more tips? Check out our forum community for help.
It's important to keep your printer in good shape to make the most out of it. In this chart, you can find a list of the extruder maintenance procedures and how frequently these should be done.
Maintenance plan (Epsilon Series)
Maintenance plan (Sigma Series)
Maintenance plan (BCN3D Sigmax)
Maintenance plan (BCN3D Sigma)
![]() Take your e-waste to a certified recycler. Check how we do it in BCN3D.
Take your e-waste to a certified recycler. Check how we do it in BCN3D.
|
You can help improve the BCN3D Knowledge Base. If you feel there are guides that we are missing or you found any error, please use this form to report it. Report form :) |