In this article, you will learn the main causes of why an infill can leave visible marks on the model's surface. You will also understand what adjustments can be made in the printing profile and printer so the piece can successfully have a uniform finish.
FFF technology is the creation of a 3D object by melting previously rolled thermoplastic and depositing it on a platform to generate a succession of layers that, once completed, form a three-dimensional object. This means that the object is composed of a surface and an infill structure, which is rigid and holds the walls.
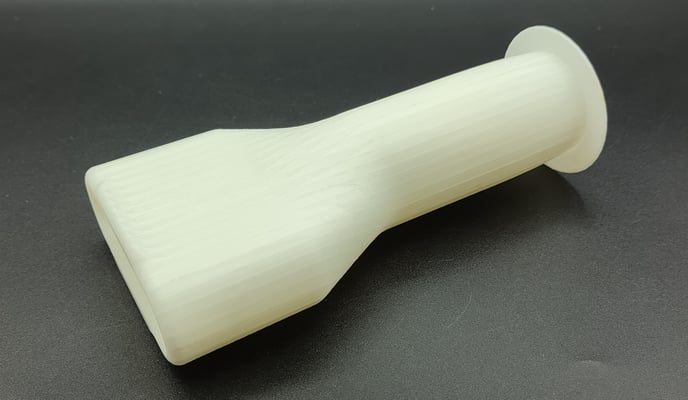
Since the walls and the infill can touch during the printing process, this can produce areas with an excessive amount of material which leaves marks on the model surface. To avoid this material excess being visible, it is necessary to correctly set the wall thickness, the infill printing order, and the infill overlap, also taking into account the hotend diameter that is used.
Wall Thickness

The first thing you need to know is if the wall is thin, it is likely that infill marks will appear, especially at the top areas of the model. This is because the material of the last layers tends to fall between the holes created by the infill pattern. In this situation, we recommend raising the wall thickness or the number of the top and bottom layers.
Note: The wall thickness can be measured in millimeters or by the number of perimeters. You can learn more about this set of parameters in the following article: Defining the shell - BCN3D Stratos
Now that you understand the importance of walls in avoiding infill marks, you may ask yourself: What is the optimal thickness? The answer is quite varied due to the fact that the minimum thickness required depends on other factors, such as the infill overlap or the hotend diameter.
Nevertheless, 3 perimeters is a good starting point as we can see in the next example:
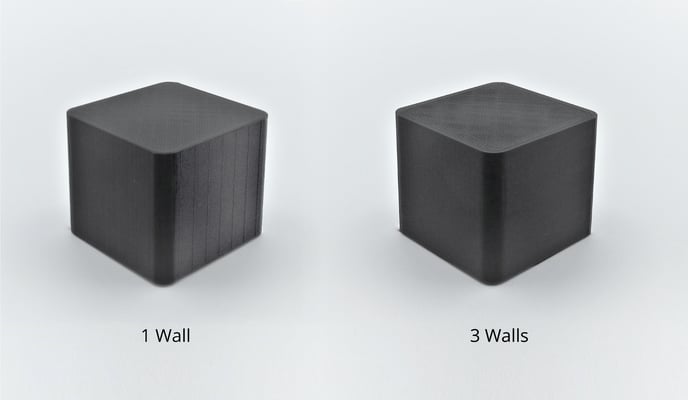
In addition to infill marks on the sidewalls, you may find the infill marked in the top layer of the model.
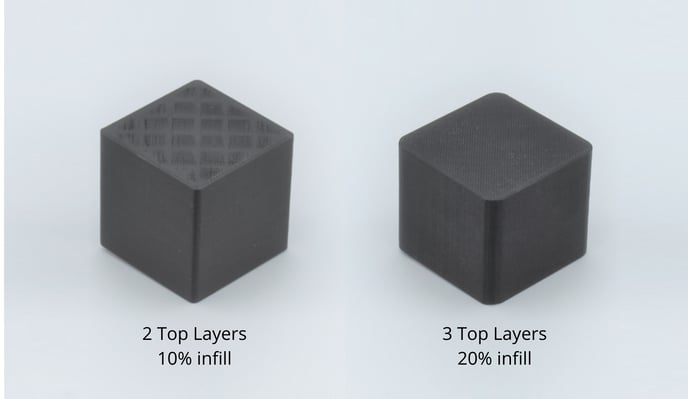
This is all because the filament falls in the holes created by the infill. To solve this issue, we need to raise the thickness of the perimeter printing at least 3 layers and set the infill density to at least 15%.
However, raising the wall thickness excessively will cause an increase in the amount of material spent and printing time. Luckily for us, there's another type of solution to reduce the infill overlap.
Infill Overlap

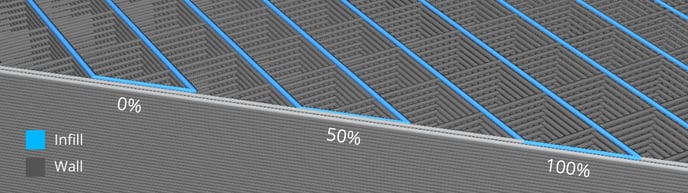
This parameter defines the infill quantity that will be printed over the model's perimeter, increasing the wall's resistance but also creating over-extruded areas.
Note: Learn more about this parameter in this article: understanding the infill
Raising the infill overlap percentage makes the printing surface more stable and rigid but it can also leave marks on the walls.
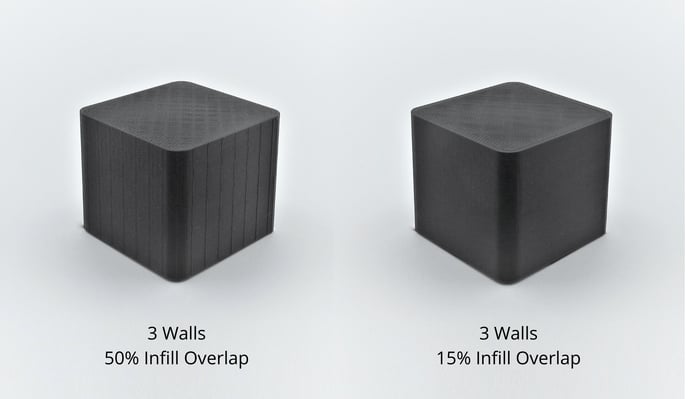
If we compare two equal pieces printed with 3 perimeters, the infill marks will be visible and easy to feel when the overlap is higher than 50%
When the overlap is under 20% and you are printing with a 0,4mm or 0,6mm hotend, the marks will no longer be visible. The optimal value to avoid infill marks and to guarantee piece stability is 10%.
Printing Order - Infill Before Walls

The printing order is also a parameter that can cause infill marks to appear on the sides of the piece's surface. Therefore, it is important to know what is the right time to activate the parameter "Infill Before Walls".
Printing the infill first allows us to create overhangs with a higher degree of tilt and greater surface quality due to the walls being held and joining the infill structure that has already been printed. However, this process can leave small marks on the side surfaces of the piece.
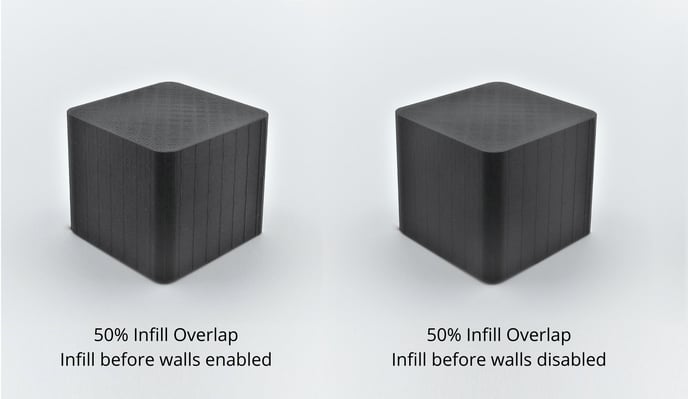
If your piece doesn't have large overhangs, you can disable this option and achieve a model's surface free of marks.
Note: The maximum overhang that the printer is able to print without supports depends on the hotend diameter and the material that is being used. You can learn more in this article: Tips to design in 3D printable models
Hotend Diameter

Lastly, you will learn how the hotend diameter has an impact on the infill marks.
Since surface errors are caused by the amount of extruded material, if there is more quantity of material in an area, the imperfections will be larger.
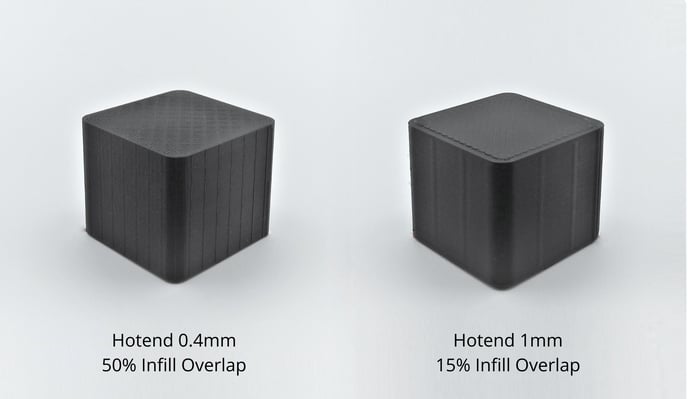
The strategy to achieve walls that have no marks with 0,4mm or 0,6mm hotends is to increase the number of perimeters and decrease the infill overlap.
However, if we are using 0,8 mm or 1 mm hotends, you should change your approach. Reduce the "infill overlap" parameter until 0% or even more, setting negative values.
Forum community
Did your repair not go as planned? Check out our forum community for troubleshooting help.
It's important to keep your printer in good shape to make the most out of it. In this chart, you can find a list of the extruder maintenance procedures and how frequently these should be done.
Maintenance Plan (BCN3D Sigma)
Maintenance Plan (BCN3D Sigmax)
Maintenance Plan (Epsilon Series)
Maintenance Plan (Sigma Series)
![]() Take your e-waste to a certified recycler. Check how we do it in BCN3D.
Take your e-waste to a certified recycler. Check how we do it in BCN3D.
|
You can help us improve BCN3D Knowledge Base. If you think we are forgetting a step or you find an error, please use this form and let us know. :) Form |