One of the most appreciated skills in the world of 3D printing is knowing how to adjust the different printing parameters to create perfect overhangs. In this article, we will explain all the actions you can take to improve the impression of bridges and overhangs.
Table of contents:
Lower the printing temperature
Split the model in multiple parts
Refrigerate the part properly

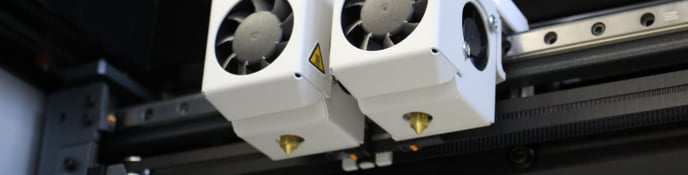
When printing unsupported overhangs we need the filament to cool down as soon as possible to prevent the filament from falling due to gravity.
Increase the speed of the layer fan, in this way the filament will solidify faster and will serve as support for the rest of the layers. Watch the printing process in case delaminations appear in the model, this is a symptom that the filament is cooling too quickly and therefore you should reduce the speed.
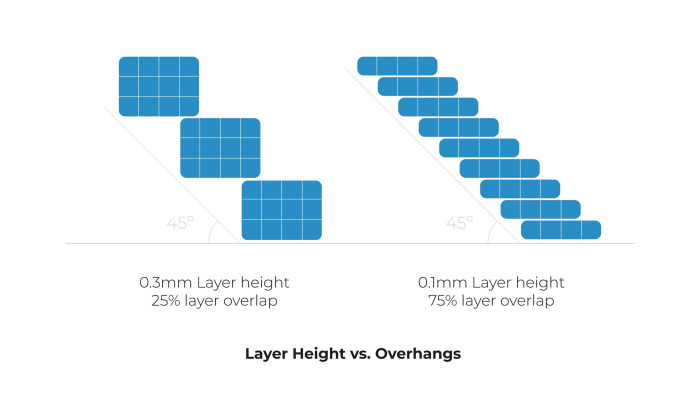
Reduce the layer height

The layer height influences two aspects when printing, one is the amount of material that is extruded and the other is to serve as a support for the next layer of the overhang.
If the layer height is reduced, less material is extruded and consequently, it will be easier for it to solidify in air. On the other hand, it reduces the ladder effect between layers that leads to the layers having greater support at the edge of the overhang.
Change the print order
The order of printing affects the stability of the overhangs, therefore establishing the correct sequence of printing substantially improves the overall surface quality of the part.
In order for the overhangs to be printed correctly, it is ideal to start the extrusion from the inside of the piece, in this way the material begins to deposit on the previously printed layers and serves as a support for the rest of the material that will be suspended in the air.
This order is achieved by deactivating the option "Exterior walls before interior" and activating the option "Infill before walls".
Print at a lower speed
The printing speed is related to the cooling of the model and also to the adhesion between layers. Reducing the printing speed increases the time in which an area of the model is cooling, in such a way that a solid is created that will serve as support for the rest of the layers.
Reduce the print speed in steps of 5mm/s and avoid reducing it below half the recommended value.
Lower the printing temperature
During the printing of the overhangs, it is sought that the material solidifies in the shortest possible time and that it does not fall due to gravity. The printing temperature plays an important role in this aspect, by printing the material colder, it is possible to cool it earlier and keep its shape.
To reduce the printing temperature, it is recommended to do it in 5ºC intervals and avoid lowering the minimum printing temperature of the material.
Learn more about the family of temperature parameters in the following articles: Temperature.
Add chamfers
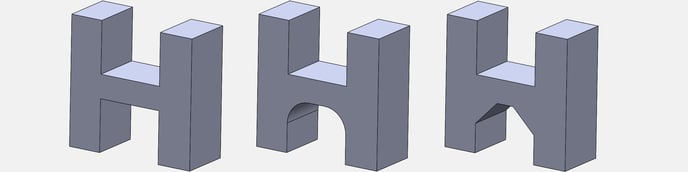
Overhangs with 45º slopes are correctly printed on all materials and hotends, so a solution at the 3D design level is to change an overhang with a greater angle for 45º chamfers.
However, there are certain combinations of materials and hotends with which you can print higher-angle overhangs and, if necessary, create chamfers with angles closer to the overhang of your model.
Visit the following article about 3D design with design tips by material and hotend diameter: Tips to design in 3D printable models
Use supports
The most effective way for all overhangs to have the best surface quality is with the use of supports, especially when the supports are constructed of water-soluble materials.
The water-soluble supports can be configured to create a solid ceiling and in contact with the piece, making the surface finish very similar to that of the first layer.
To configure the supports visit the following articles: BCN3D Stratos: Supports and Improve the supports
Split the model in multiple parts
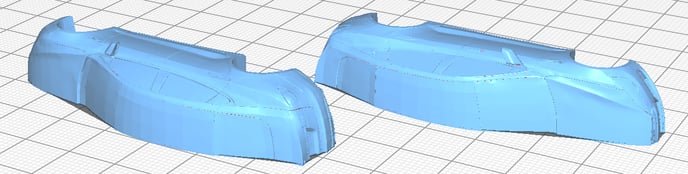
This is the most intrusive option but it can be the best solution for complicated parts or for materials whose thermal properties make it difficult to print overhangs.
All problem areas can be cut from the design, creating easy-to-print parts with overhangs of 45º or less and reducing the need for modifications to the print profile.
Visit this guide for tips on how to split your model: Split the model in multiple parts.
Forum community
Do you need more advice? Check out our forum community.
It is important to keep your printer in good condition to get the most out of it. In this chart, you will find a list of maintenance procedures and the frequency with which they should be performed.
Maintenance plan (BCN3D Sigma)
Maintenance plan (BCN3D Sigmax)
Maintenance plan (Epsilon series)
Maintenance plan (Sigma series)
![]() Take your e-waste to a certified recycler. Check how we do it at BCN3D
Take your e-waste to a certified recycler. Check how we do it at BCN3D
|
You can help us improve BCN3D Knowledge Base. If you think we are forgetting a step or you find an error, please use this form and let us know. :) Form |