What is Layer Shifting and why it happens.
This issue can have different causes depending on how it looks. It normally is a sign of incorrect belt tension and alignment or a poor printing configuration. It can also be a sign that a component is malfunctioning.
How to fix the layer shifiting
1. Check the BCN3D Stratos printing profile.

The default settings for our BCN3D filaments have been tailored for good quality and reliable results and are fully tested by our laboratory. If you are experiencing this issue with default profiles and our own filaments, go to the next point.
If you are printing with a different filament brand or with custom profiles, there are some settings to take into account to prevent layer shifting:
- Reduce the Printing Speed: If it is too high, the motor pulleys can skip some teeth from the belts, or the motors may get blocked due to overheating causing layer shifting. Keeping a printing speed below 60mm/s will prevent the shifting.
- Reduce the Travel speed: This is the speed at which the printhead moves from one point to another, if it moves too fast and makes contact with the print, it will get stuck and lose some steps. Normally, a travel speed of 150mm/s works great, but you can lower it to 100mm/s.
- Adjust the Retraction: Another way to prevent printhead impacts from happening is to avoid oozing and blob creation, retraction settings are key for that. You can increase the retraction distance to fix this.
- Enable the Z hop: This makes the printhead lift a bit from the print before traveling, preventing even more impacts, if you experiencing layer shifting, make sure to keep it enabled if the filament is not too viscous, like PLA or ABS.
- Disable Combing mode: This optimizes the number of travels in a print job, making it quicker and avoiding grinding the filament. This is especially useful for small prints with a lot of tiny details, but for bigger models, it is best to disable it, as it is possible that the printhead goes from one point to another within the print without retracting or hopping, and it is very likely that it will impact the print itself and shift.
2. Set the right belt tension.
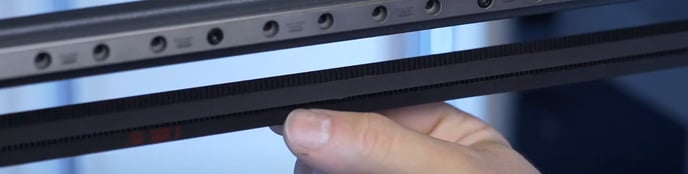
The first thing to look at here is if the belts are tight enough. If there's not enough tension, the motors won't be able to transfer the movement to the printheads and cause layer shifts.
- Click on the picture corresponding to your printer to learn how to adjust the belts:
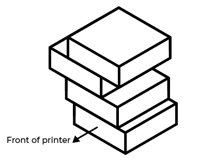
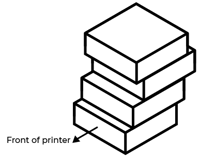
3. Identify the direction of the layer shifts.
If the belts are tight, the configuration is good and layer shifting is still occurring, see if the shifts are aligned in the X or Y direction.
- Depending on the direction, click on the picture corresponding to your printer to find more detailed information: